Have you seen the ingredients in store bought instant pancake batter?? Learn how to freeze dry homemade pancake batter using simple ingredients you already have in your kitchen.
I remember in my early days of my marriage going shopping with my husband. He always bought a specific brand of pancake mix. This always irritated me, because I grew up with homemade pancakes.
This was long before the days of learning how to read a label on a store bought item. I think I was more irritated because we had to pay for something premixed that I could easily make with ingredients that I had at home.
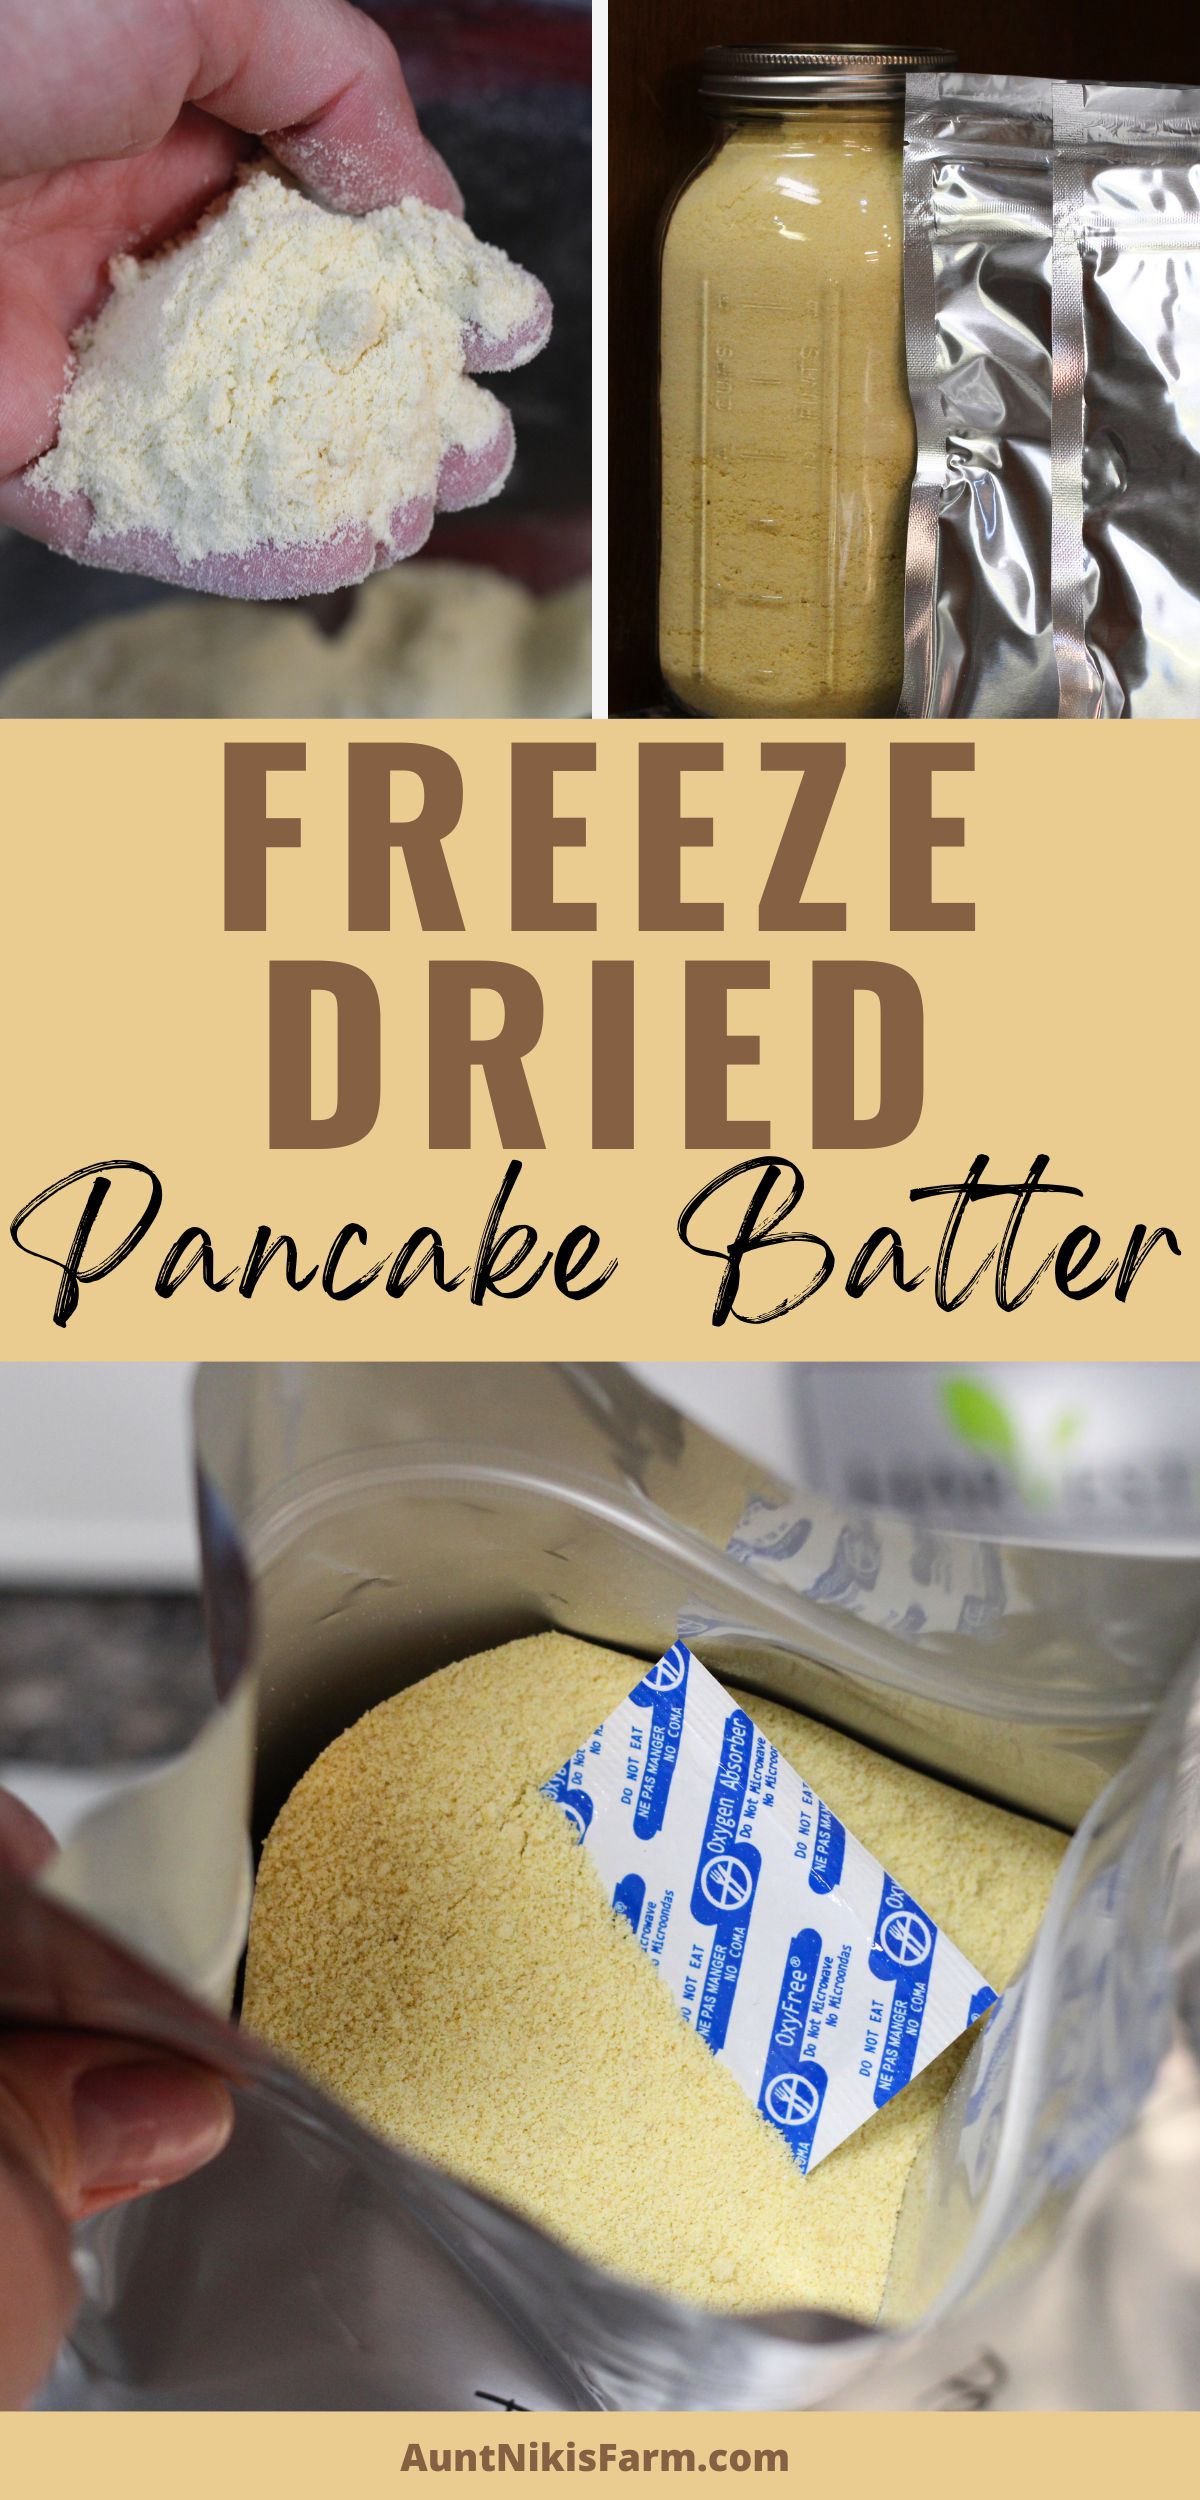
Freeze Dried Pancake Batter
Now that I do know how to read labels, I try hard to avoid ingredients such as enriched bleached flour, dextrose, defatted soy flour, soybean oil and leavening (although, I definitely do use leavening products like baking powder, I just choose to make my own to avoid all of the unnecessary added extras that come in store bought baking powder). These are just some of the ingredients that are on that specific brand of pancake mix.
By making pancake batter at home and freeze drying it, I can choose the ingredients I want to put into it and feel a lot better about what I am feeding to my family.
5 Things I Love About Instant Pancake Batter
- The Convenience – I can take a jar or bag with me while camping or traveling and have good home cooked pancakes without hauling lots of ingredients with us.
- So Easy – The eggs and milk are mixed into the batter already, so the only liquid that I need add is water.
- Fresh Taste – They rehydrate perfectly, and the pancakes taste just as good as if I were using freshly made batter.
- Storage – This batter will store for up to 25 years if packaged properly.
- Using Up Excess – When I have a bunch of extra eggs and raw milk in the springtime, this is another way that I can preserve those things, versus freeze drying eggs and milk separately. I do still freeze dry some of these separately, but I defiantly love the ease of having already made items like pancake batter on my pantry shelves.
Ingredients Needed for Freeze Drying Homemade Pancake Batter
You will need to grab some basic pantry ingredients to mix up a big batch of pancake batter.
- Flour – I use all-purpose flour or freshly milled soft white wheat to make my pancake batter. You can customize this and use buckwheat or any grain that you would like here.
- Baking Powder – I always make my own baking powder with only 3 ingredients.
- Salt – Hands down, Redmond salt is my all-time favorite. It is the only salt that I have purchased for years. If you are going to go through the trouble of making a good quality pancake batter, then please choose a salt without anticaking agents and other chemicals added.
- Milk – We usually have raw milk on hand, so that is what I use. When we are out, I opt for this pasteurized milk.
- Eggs – I have used both fresh eggs and freeze dried eggs.
Supplies Needed to Freeze Dry Pancake Batter
Let’s quickly cover everything that you will need to freeze dry pancake batter at home. You can find a printable version at the end of the post.
- Freeze Dryer – I purchased my freeze dryer from Harvest Right in 2021. I have a medium 4 tray Freeze Dryer. They have now updated this model to hold 5 trays.
- Oil or Oil Free Pump – When you purchase a freeze dryer, you will get a pump too. The pump is the key to freeze drying foods. This kicks on to pull the moisture out of the food. I chose the Premier Industrial Pump.
- Freeze Dryer Trays – I actually have 2 full sets of trays for my freeze dryer. One set is in the freeze dryer and one set is in the freezer filled with food ready to be dried. Homesteading Tip: Each freeze dryer has a set of trays that fit that specific machine. Make sure you purchase the ones that fit your machine.
- Freeze Dryer Lids (optional) – I didn’t have a set of lids for my first year, but since investing in them, I now wonder what took me so long! I highly recommend grabbing a set of lids right away, so you can stack the trays in your freezer. The lids also double as trays with dividers to freeze dry food in.
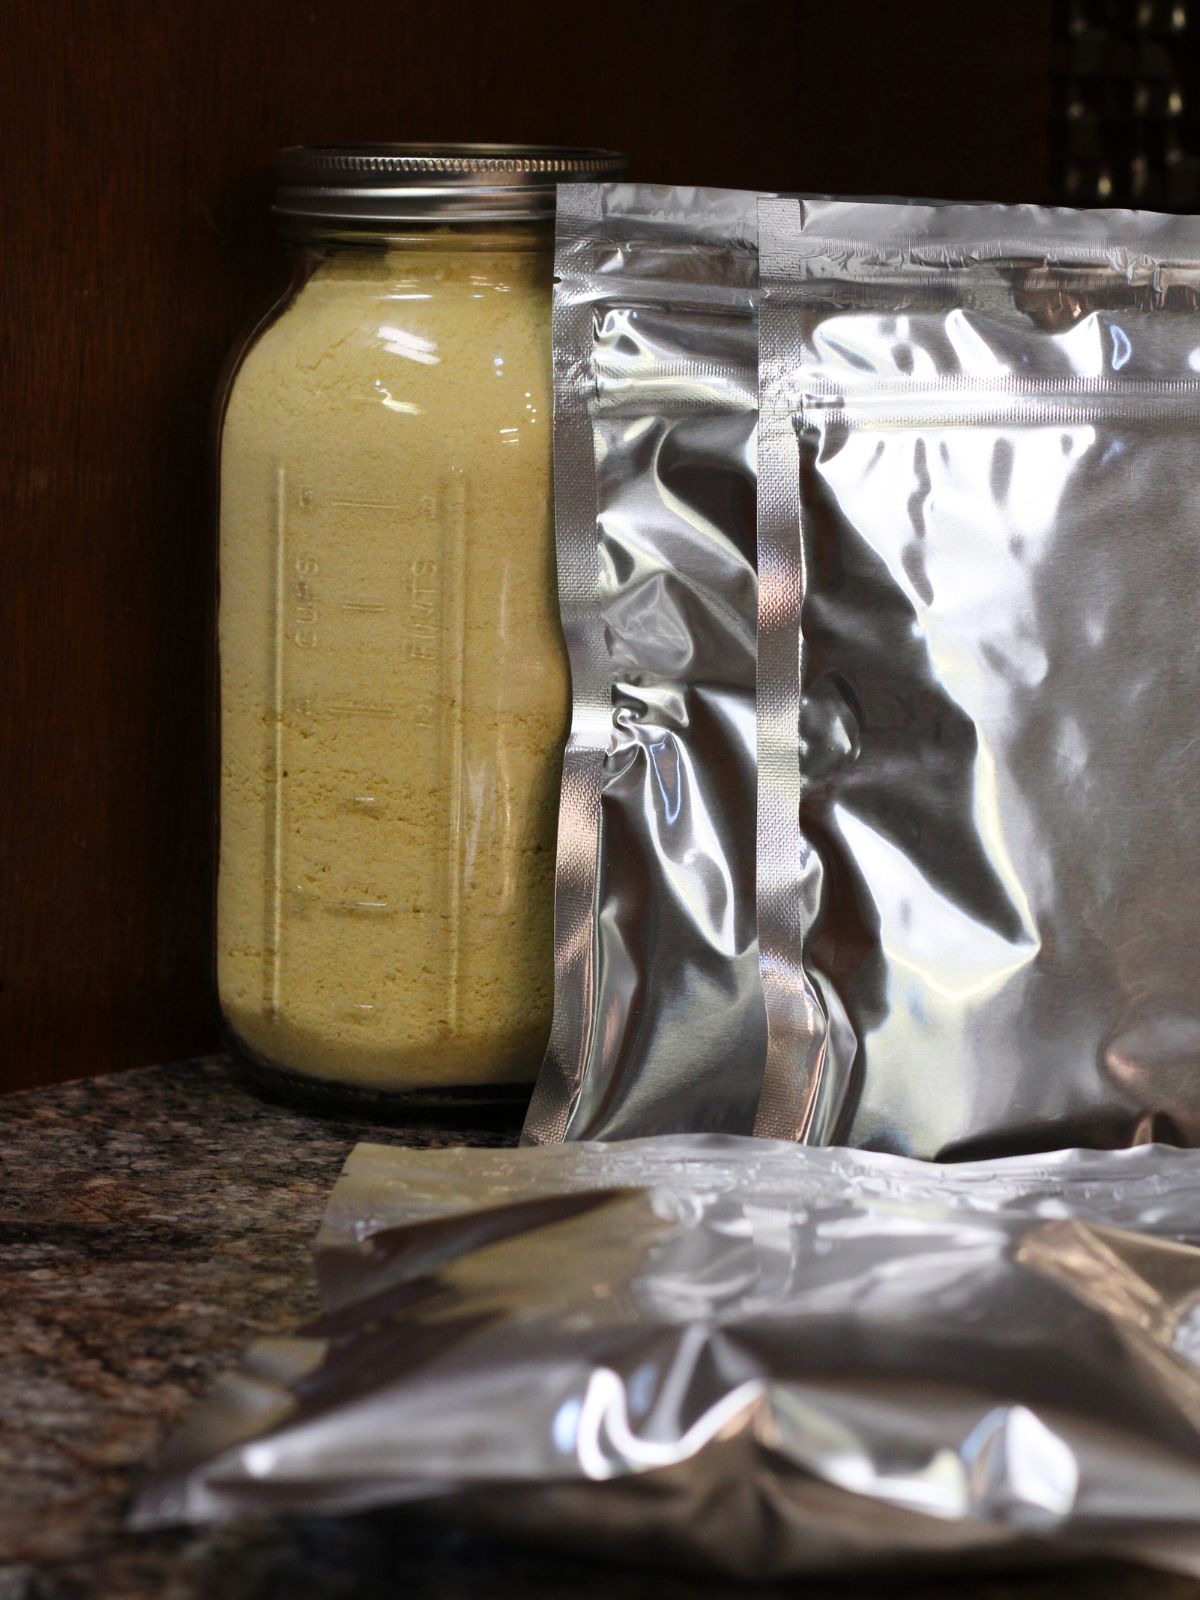
- Canning Funnel – A good stainless steel canning funnel is a staple item that every kitchen should have. I use this for transferring freeze dried food into jars, as well as into Mylar bags.
- Metal Spatula – Use a metal spatula to remove the pancake batter from the trays. You can scrape the trays and not let any go to waste. This is also the perfect tool for flipping your frying pancakes on a cast iron griddle.
- Large Mixing Bowl – Grab a large bowl to mix the batter in.
- Whisk – Use a whisk to mix the batter until it is fully incorporated. I also use my whisk when mixing the water into the freeze dried batter just before serving them.
- Rubber Scraper Spatula – I use a rubber spatula to scrape the sides of the bowl.
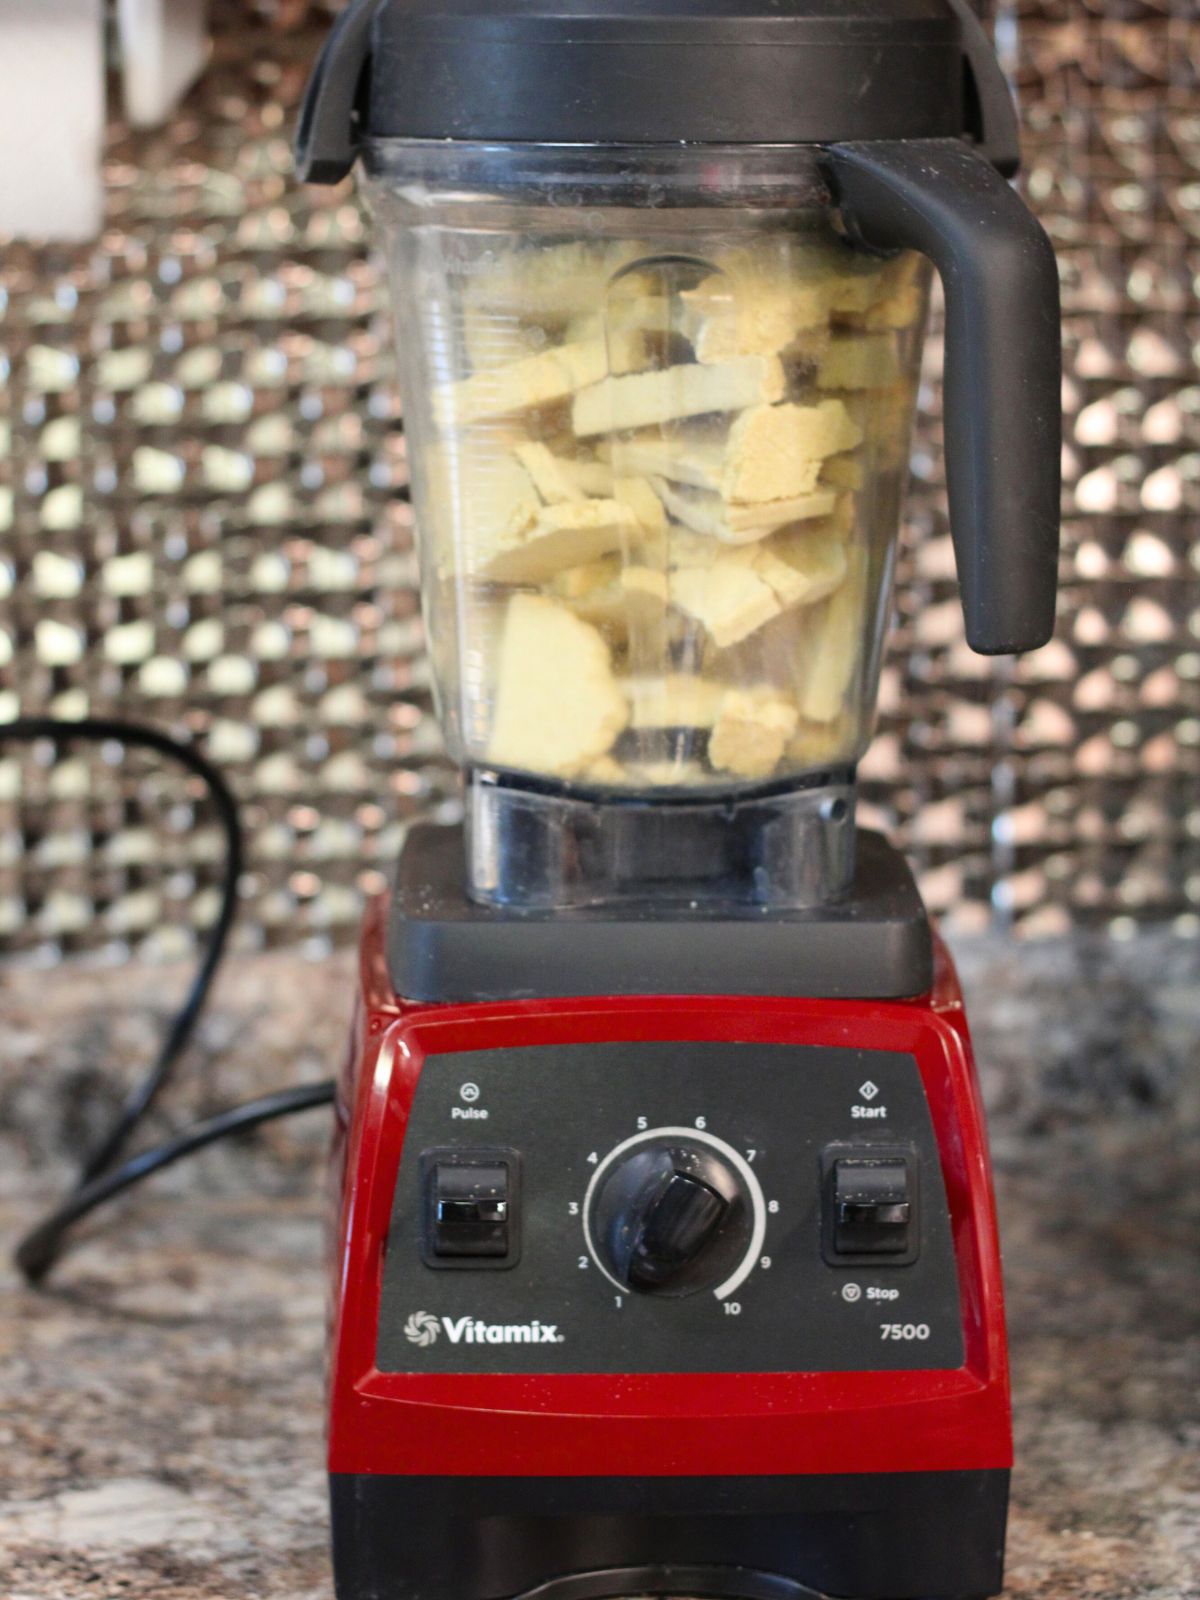
- Food Processor or a Blender – Use a food processor or a blender to powder the batter after removing it from the freeze dryer, and before putting it into storage.
- Mylar Bags – These are the bags needed to protect your freeze dried food for long term storage. I purchase Mylar bags directly through Harvest Right or the quart sized ones and the gallon sized ones that I purchase through my favorite company – Azure Standard. I do have all three sizes in my freeze drying supply tote, but if you had to start with just one, I would suggest the Harvest Right ones. They are about 2 quarts worth and usually will hold a full tray of my freeze dried food well, plus I got some included when I purchased my freeze dryer from Harvest Right.
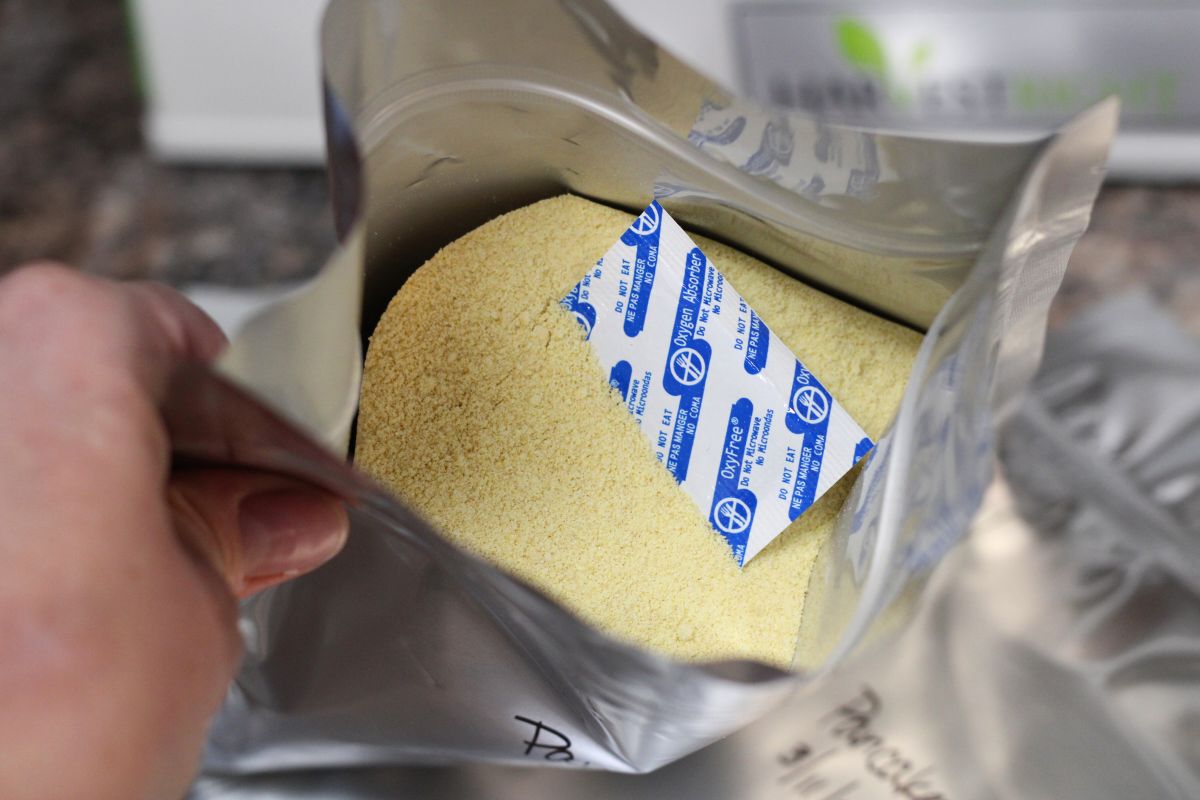
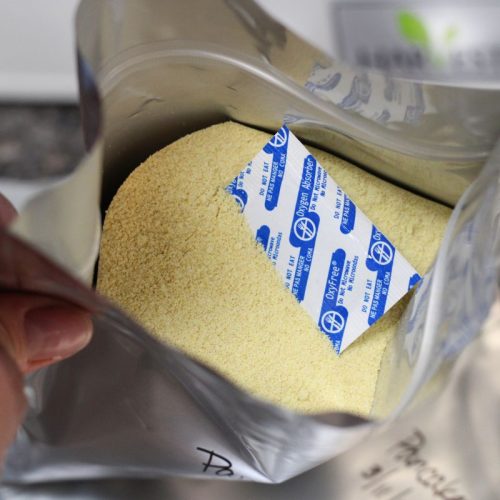
- Oxygen Absorbers – Oxygen absorbers are placed into the Mylar bags before sealing. I purchase the ones that fit the Harvest Right bags here, the quart sized ones here, and the gallon sized ones here.
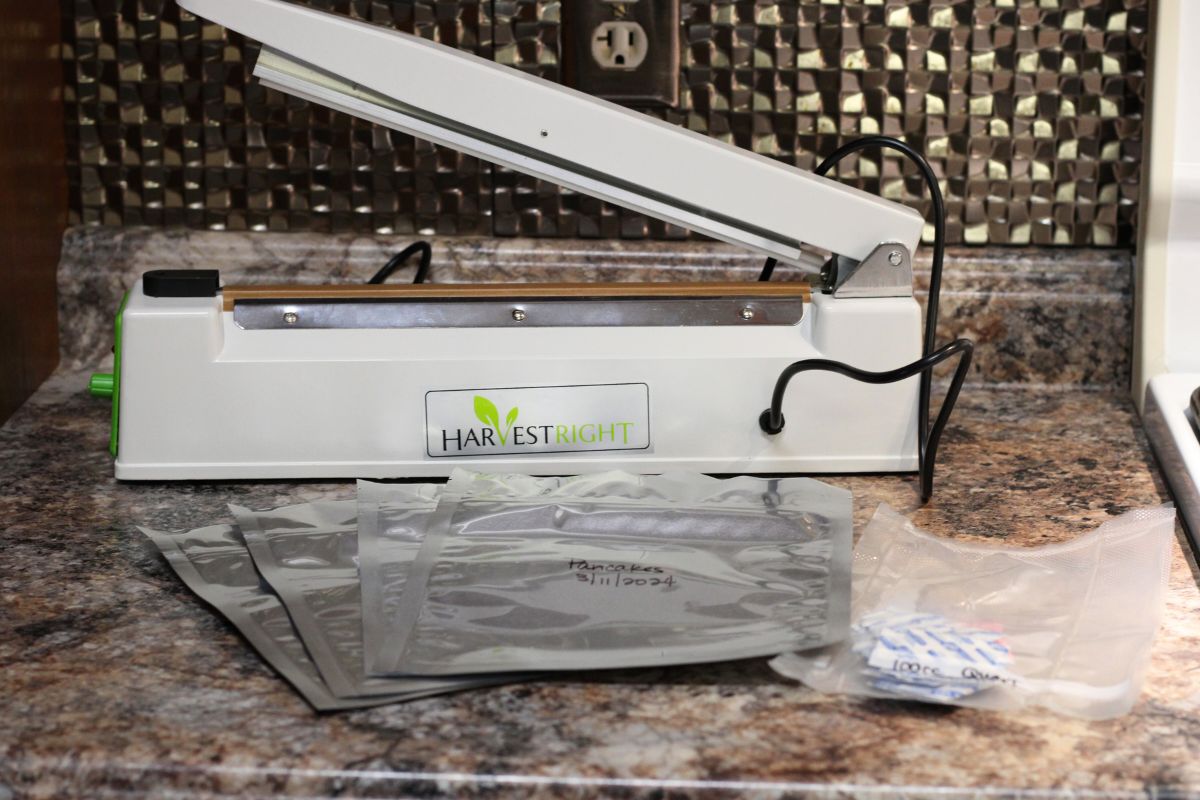
- An Impulse Sealer – This is the sealer that you will need to seal Mylar bags for long term storage. Mine came with my Harvest Right Freeze Dryer.
- Canning Jars -You can store your freeze dried food in quart canning jars or in half gallon sized jars for short term storage, up to a year.
- Canning Lids – Canning lids will be used on the canning jars when storing your food short term.
- FoodSaver Vacuum Sealer – You will need a FoodSaver Vacuum Sealer to use with the FoodSaver Jar Sealer. These work together to vacuum the oxygen out of canning jars for short term storage of your freeze dried foods.
- FoodSaver Jar Sealer – Another must have tool for your kitchen. I recommend that you have a wide mouth and regular mouth jar sealer to vacuum the air out of the jars of freeze dried food and make them shelf stable for a year.
- Permanent Marker – You can never have to many permanent markers. Make sure you label everything!
- Freezer – I use my chest freezer to pre-freeze foods before placing them into my freeze dryer. It makes the freeze drying process a lot quicker, because you can save hours by having everything frozen before you fill your machine. This also works well to always have your extra set of trays filled and ready to place into your machine after the defrosting process.
How to Freeze Dry Pancake Batter
Well, it’s time to start freeze drying homemade pancake batter! Remember that you can find all of the instructions in the printable at the end of the post.
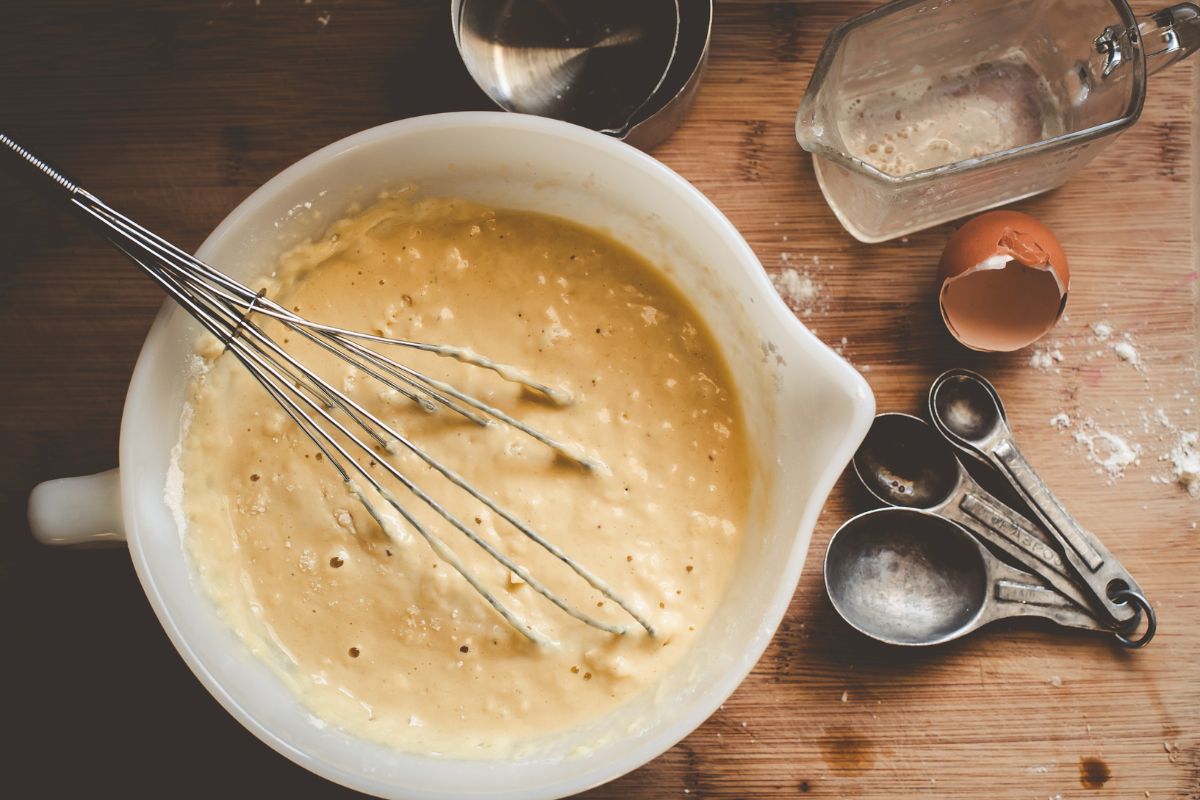
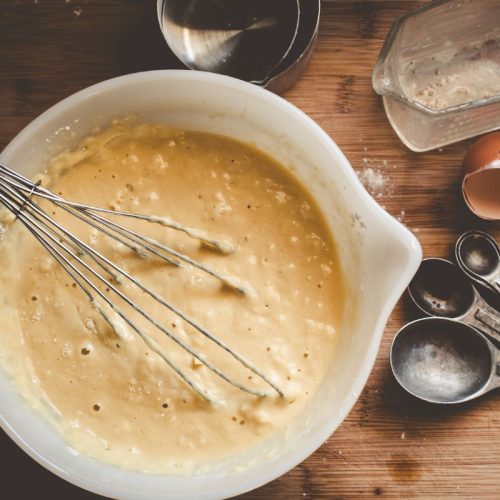
- Begin by measuring out the dry ingredients into a large mixing bowl. Whisk the dry ingredients together well.
- Add the eggs and milk into the dry ingredients. No need to dirty another bowl. You can add them directly to the top.
- Whisk the batter together until it is fully incorporated. Add more liquid if needed to get a good pancake batter consistency.
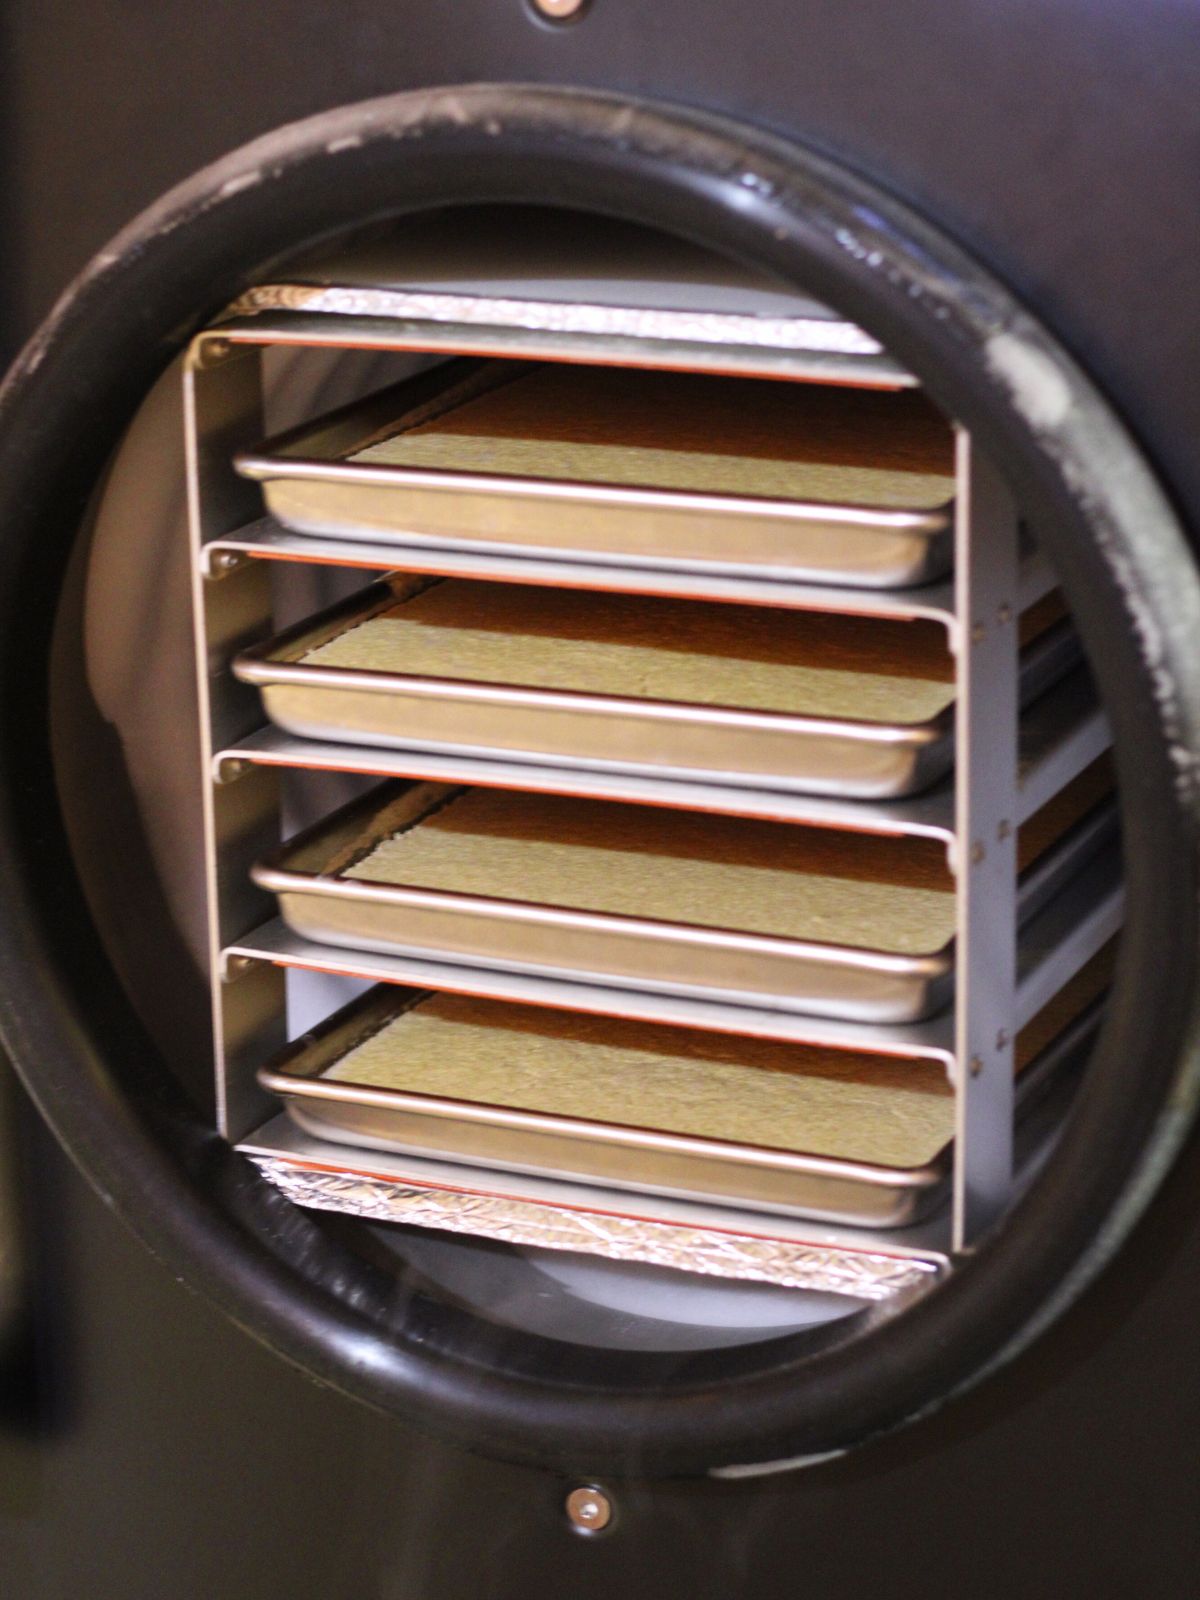
- Pour the batter onto your freeze dryer trays. Each recipe on the printable will fill 2 freeze dryer trays.
- Place a lid onto the tray and freeze for at least 24 hours.
- Note – Technically, you don’t have to pre-freeze the batter, but I do highly recommend it.
By freezing the batter on the trays first, you save time in the freeze dryer. My home freezer is always running, so I have just dedicated a spot in there to have a stack of trays ready to go into the freeze dryer next.
Next, part of the freeze dryer system is a vacuum pump. In my experience, when you add liquid to the freeze dryer trays and let the freeze dryer do the freezing for you, it doesn’t actually freeze it completely solid. Because of this, when the vacuum pump kicks on, the liquid that isn’t quite froze all the way, explodes and makes a BIG mess in the freeze dryer. I have learned this from experience.
Homesteader Tip – Things like tomatoes are included in this as well. You can see the difference between tomatoes I pre-froze and tomatoes I did not pre-freeze in this Freeze Dried Tomatoes post. This is where I learned my lesson and now, I always freeze anything with a lot of liquid first! - The following day, turn on your machine and follow the instructions on the screen.
- Load the trays when prompted and again follow the screen for exact instructions.
- When the process has completed, I push the ‘warm trays’ button and wait until they are all warmed up.
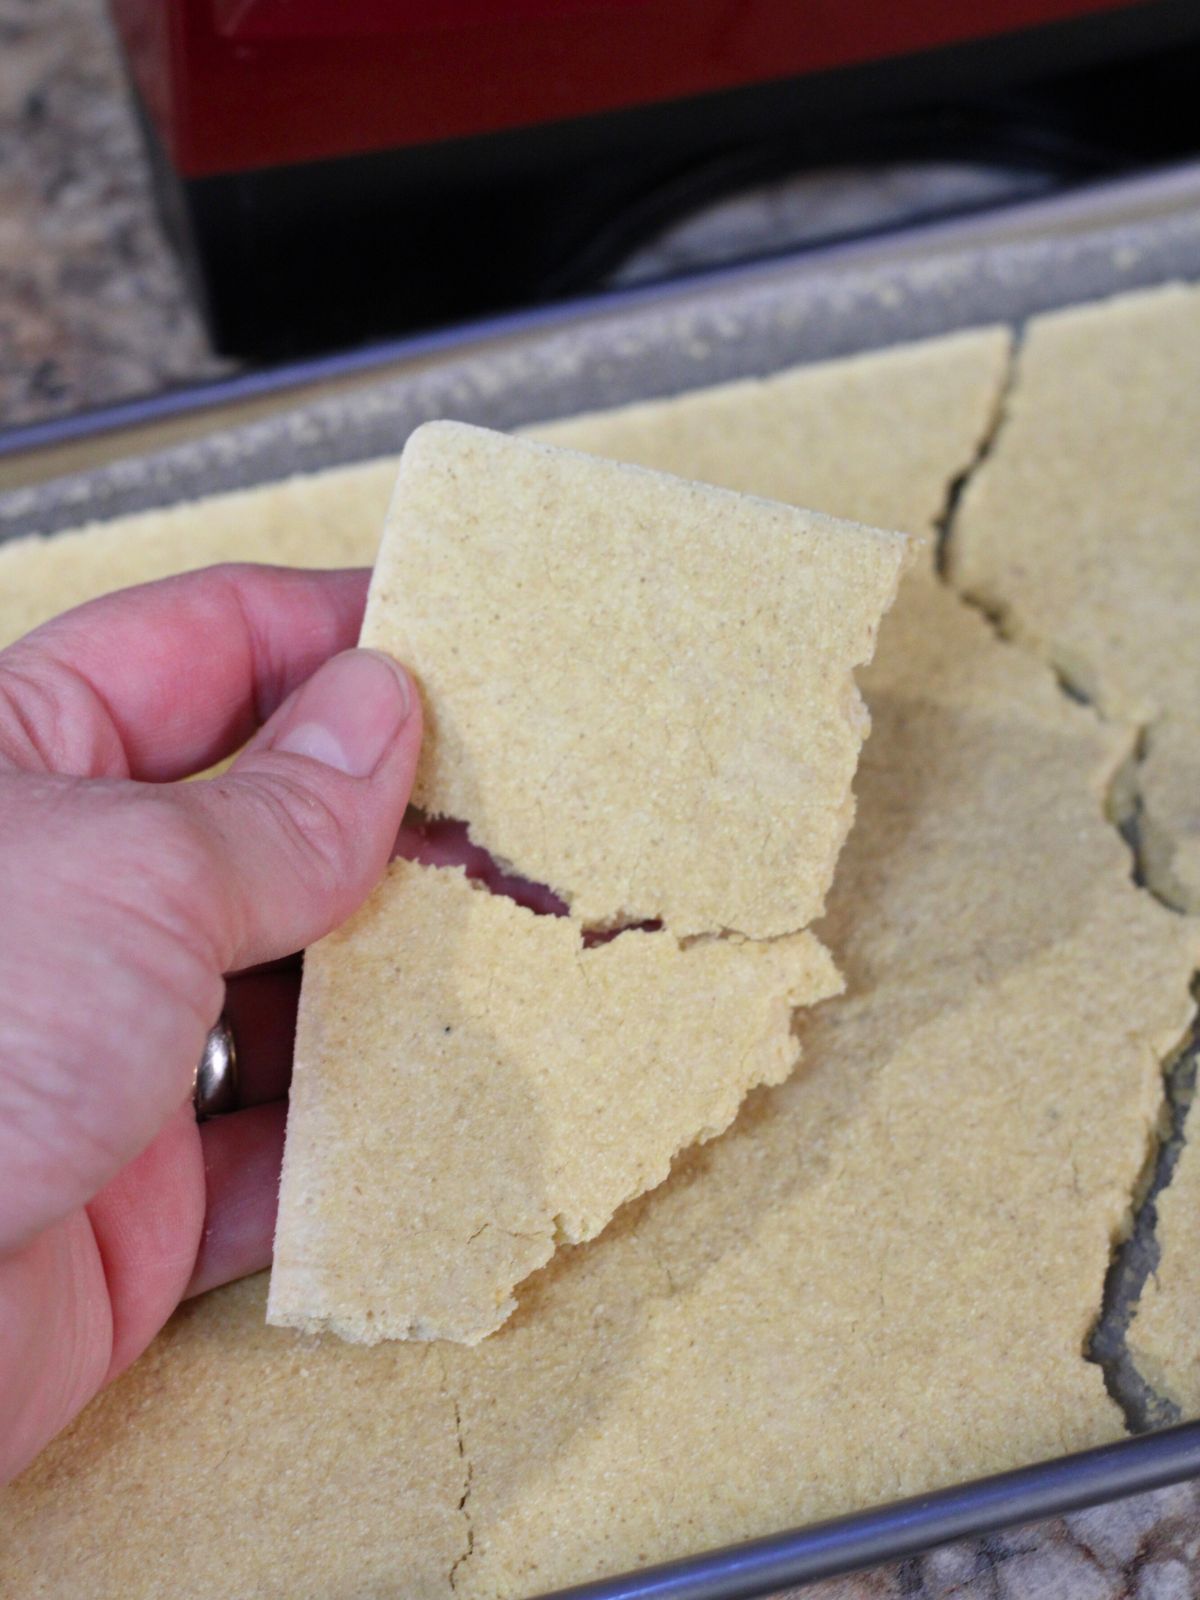
- Pull out the trays and check to make sure that the batter is completely dried on all of the trays. If it is still moist, continue to dry for another 2 hours before checking again. Continue this until everything is dried.
- Decide if you are putting the pancake batter into short or long term storage.
- Warm the trays again (this prevents condensation from forming on cold trays into a warm environment – you don’t want any moisture in the batter).
- Pull out one tray at a time and store as you have chosen.
- After all of the trays have been removed, you can defrost your machine either naturally by opening the door, or letting the machine defrost it for you quickly so you can load your next set of trays that are waiting in your freezer.
How to Store Freeze Dried Pancake Batter
You can store your freeze dried pancake in one of two ways – short term storage or long term storage.
- Short term storage – Anything you will use within a year. This can be stored in a jar, vacuum sealed, and placed on your shelf.
- Long term storage – Anything you want to store for a year to 20+ years. This should be stored in a mylar bag with an oxygen absorber.
Short term storage – store in a glass canning jar:
- Wash and dry your jars and canning lids. Homesteading Tip – This is one way I would recommend reusing your canning lids. Make sure they are in nice shape without any dents, and you can reuse them lots of times for freeze dried food short term storage. I used to always dent my lids when removing them until my son bought me this can opener for my birthday. I highly recommend getting one!
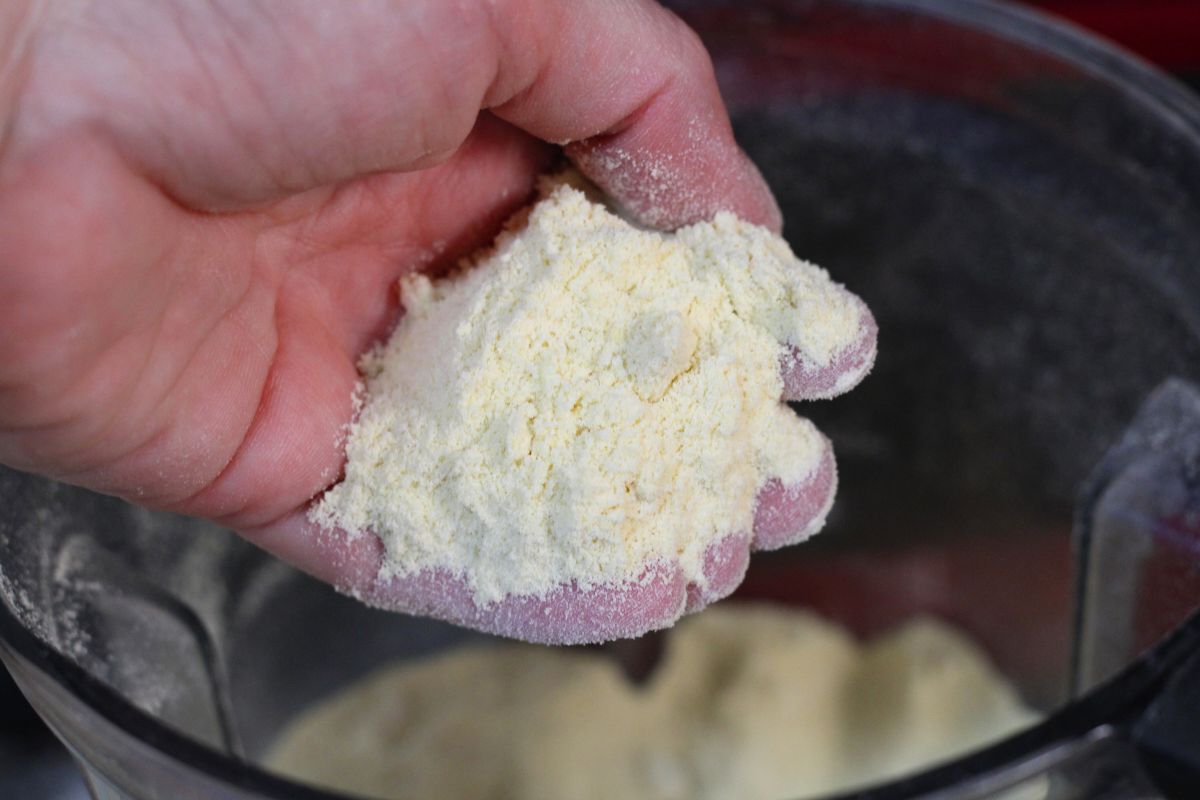
- Use your blender to mix the dried batter into a powder.
- Use a funnel to fill jars with the powder.
- Seal the lid with your FoodSaver Vacuum Sealer and FoodSaver Jar Sealer.
- Label the jars with your permanent marker. Trust me, even if you can see what is in there, label the lid with the contents and the date which it was made.
- Store the jars away from direct sunlight, moisture, and oxygen (this is why I use the jar sealer).
Long term storage – store in a mylar bag:
- Grab your bags, a funnel, a permanent marker, oxygen absorbers, and an impulse sealer.
- Label the bags first before adding any food. Write the contents, any quick notes on rehydrating, and the date.
- Use your blender to mix the dried batter into a powder.
- Use the funnel to fill the bags with the powdered batter.
- Add the properly sized oxygen absorbers to each bag.
- Make sure that the powder is all at the bottom of the bag. Do not overfill. Wipe where the seal is with a dry cloth to make sure nothing will interfere with the seal. Use the impulse sealer to seal the bags. I usually seal them twice to be on the safe side.
- Store them for 20+ years by properly sealing them with the oxygen absorbers, placing them out of direct sunlight, and storing them away from moisture.
Homesteading Tip – I place all of my mylar bags with freeze dried food in plastic totes. Label the outside of the tote to easily grab what you are looking for.
How to Rehydrate Freeze Dried Pancake Batter
Technically you should number and weigh the trays before you put them into the freeze dryer. Then weigh them again when they are finished freeze drying. Take the difference and that is the amount of water to add back to that tray to fully reconstitute. Divide that number by how many servings on a tray to get smaller ratio portions.
I don’t know about you, but I don’t have the time to keep track of which tray is which, much less remember how much water needs to be added to each tray.
The best part about freeze dried pancake batter is that it contains everything that you need to make pancakes. The only other ingredient needed is water, making this a true instant pancake mix!
In all honesty, I never measure when I reconstitute this mixture. I have been making pancakes from scratch for years, and I just dump in roughly how much batter I will need and start dumping in water. I will continue adding water until I get to a normal pancake batter consistency.
If I add to much water, I will just add a little more batter to make up the difference.
Although I do realize that this freaks some people out, so I did my best to come up with measurements for you.
Mix 1 cup of pancake batter with 3/4 cup to 1 cup of water and you should have a pretty good consistency. 1 cup of dry batter should make 3-4 pancakes. So decide how many pancakes you will need and add enough cups of batter to get that amount.
Put a little butter on a cast iron griddle and start frying pancakes as you would using any other batter.
Common Questions
I get a lot of questions about how to freeze dry foods. Here are a few common questions and their answers to help you out!
Absolutely not! I store my food in mylar bags because it is convenient. I love to take things like freeze dried eggs or freeze dried strawberries and homemade granola when we go camping. By storing it in bags, it is much easier to travel with and I don’t have to worry about hauling heavy jars that could get broken.
Technically, you don’t have to pre-freeze the batter, but I do highly recommend it.
By freezing it on the trays first, you save time in the freeze dryer. My home freezer is always running, so I have just dedicated a spot in there to have a stack of trays ready to go into the freeze dryer next.
Next, part of the freeze dryer system is a vacuum pump. In my experience, when you add liquid to the freeze dryer trays and let the freeze dryer do the freezing for you, it doesn’t actually freeze it completely solid. Because of this, when the vacuum pump kicks on, the liquid that isn’t quite froze all the way, explodes and makes a BIG mess in the freeze dryer. I have learned this from experience.
Homesteader Tip – Things like tomatoes are included in this as well. You can see the difference between tomatoes I pre-froze and tomatoes I did not pre-freeze in this Freeze Dried Tomatoes post. This is where I learned my lesson and now, I always freeze anything with a lot of liquid first!
A good rule to follow is-
If you store the batter in a glass jar, seal the top so no moisture gets in (I do this by using my FoodSaver and the jar sealer). This batter should easily last for up to one year in a cool, dark location.
If you plan to store it long term (up to 25 years!), you will need to store it in a mylar bag with an oxygen absorber.
Even More Food to Freeze Dry Next
How to Rehydrate Freeze Dried Pancake Batter
Equipment
- Measuring Cup
- Bowl
- Whisk
- Metal Spatula
- Cast Iron Griddle
Ingredients
- 1 cup Freeze Dried Pancake Batter
- 3/4-1 cup Water
Instructions
- Place the freeze dried pancake batter in a bowl.
- Add 3/4 to 1 cup of water to the dry ingredients.
- Mix well and adjust by adding a little more dry batter or water until you get the perfect pancake consistency.
- Preheat a cast iron griddle and add a little butter to sizzle on the pan.
- Use a 1/3 cup measuring cup for the perfect sized pancakes. Place a scoop onto the hot griddle.
- Flip once you start seeing bubbles on the top. Brown the other side and place on a platter.
- Homesteading Tip: Place an oven safe platter or baking dish in a warm oven. Add the pancakes to the warm oven to keep them all warm.
- Serve hot with a bunch of butter and real maple syrup.
Freeze Dried Pancake Batter
Equipment
- Freeze Dryer with an Oil or Oil-Free Pump
- Freeze Dryer Trays
- Freeze Dryer Lids optional
- Canning Funnel
- Metal Spatula
- Large Mixing Bowl
- Whisk
- Rubber Scraper Spatula
- Food Processor or Blender
- Freezer
- Permanent Marker
- Mylar Bags – Long Term Storage
- Oxygen Absorbers – Long Term Storage
- Impulse Sealer – Long Term Storage
- Canning Jars and Lids – Short Term Storage
- FoodSaver Vacuum Sealer – Short Term Storage
- FoodSaver Jar Sealer – Short Term Storage
Ingredients
- 4 cups Flour All-Purpose or Freshly Milled Grain
- 4 teaspoons Baking Powder
- 2 teaspoons Salt
- 2 tablespoons Sugar (Optional) Cane Sugar, Maple Sugar, Sucanant, or Coconut Sugar are good options.
- 4 Large Eggs
- 2½-3 cups Milk – Raw or Pasteurized or Clabber or Buttermilk
Instructions
- Begin by measuring out the dry ingredients into a large mixing bowl. Whisk the dry ingredients together well.
- Add the eggs and milk into the dry ingredients. No need to dirty another bowl. You can add them directly to the top.
- Whisk the batter together until it is fully incorporated. Add more liquid if needed to get a good pancake batter consistency.
- Pour the batter onto your freeze dryer trays. Each recipe will fill 2 freeze dryer trays.
- Place a lid onto the tray and freeze for at least 24 hours.
- The following day, turn on your machine and follow the instructions on the screen.
- Load the trays when prompted and again follow the screen for exact instructions.
- When the process has completed, I push the ‘warm trays’ button and wait until they are all warmed up.
- Pull out the trays and check to make sure that the batter is completely dried on all of the trays. If it is still moist, continue to dry for another 2 hours before checking again. Continue this until everything is dried.
- Decide if you are putting the pancake batter into short or long term storage.
- Warm the trays again (this prevents condensation from forming on cold trays into a warm environment – you don’t want any moisture in the batter).
- Pull out one tray at a time and store as you have chosen.
- After all of the trays have been removed, you can defrost your machine either naturally by opening the door, or letting the machine defrost it for you quickly so you can load your next set of trays that are waiting in your freezer.
How to Store Freeze Dried Pancake Batter
Short Term Storage – Store in a Glass Jar:
- Wash and dry your jars and canning lids.
- Use your blender to mix the dried batter into a powder.
- Use a funnel to fill jars with the powder.
- Seal the lid with your FoodSaver Vacuum Sealer and FoodSaver Jar Sealer.
- Label the jars with your permanent marker.
- Store the jars away from direct sunlight, moisture, and oxygen (this is why I use the jar sealer).
Long Term Storage – Store in a Mylar Bag:
- Grab your bags, a funnel, a permanent marker, oxygen absorbers, and an impulse sealer.
- Label the bags first before adding any food. Write the contents, any quick notes on rehydrating, and the date.
- Use your blender to mix the dried batter into a powder.
- Use the funnel to fill the bags with the powdered batter.
- Add the properly sized oxygen absorbers to each bag.
- Use the impulse sealer to seal the bags. I usually seal them twice to be on the safe side.
- Store them for 20+ years by properly sealing them with the oxygen absorbers, placing them out of direct sunlight, and storing them away from moisture.
- Homesteading Tip – I place all of my mylar bags with freeze dried food in plastic totes. Label the outside of the tote to easily grab what you are looking for.
Notes
By freezing it on the trays first, you save time in the freeze dryer. My home freezer is always running, so I have just dedicated a spot in there to have a stack of trays ready to go into the freeze dryer next.
Next, part of the freeze dryer system is a vacuum pump. In my experience, when you add liquid to the freeze dryer trays and let the freeze dryer do the freezing for you, it doesn’t actually freeze it completely solid. Because of this, when the vacuum pump kicks on, the liquid that isn’t quite froze all the way, explodes and makes a BIG mess in the freeze dryer. I have learned this from experience.
Homesteader Tip – Things like tomatoes are included in this as well. You can see the difference between tomatoes I pre-froze and tomatoes I did not pre-freeze in this Freeze Dried Tomatoes post. This is where I learned my lesson and now, I always freeze anything with a lot of liquid first!
Pin this for Later

How to Freeze Dry Pancake Batter

How to Freeze Dry Eggs

How to Freeze Dry Tomatoes

Homemade Blueberry Jam with Honey

How to Freeze Dry Strawberries

Easy Homemade Baking Powder

How to Freeze Peppers

The Easiest Way To Cut Bell Peppers
I am not a lawyer, health professional, or a doctor. All information on this website, social media, and emails is based on personal experience and research. It is not meant to be taken as legal or medical advice.
We are a participant in the Amazon Services LLC Associates Program, an affiliate advertising program designed to provide a means for us to earn fees by linking to Amazon.com and affiliated sites.
Thank you for using the links provided and supporting my blog and small business at no additional costs to you.
Charlene says
Haven’t made it yet, but I love it! Brilliant. Will be doing this soon. Thanks.
Aunt Niki’s Farm says
I hope you like it!
Sharon Heath says
If a mason jar is sealed and stored in the dark, why is it still considered short term storage?
Aunt Niki’s Farm says
Hi Sharon,
Great question!
It is recommended that you use things stored in mason jars within 1-2 years, making it short term storage, versus storing in a Mylar bag for up to 25 years.
My guess for this recommendation is that the seal could break on the jar and cause it to get moisture in it, but Mylar bags are permanently sealed. I just follow what is recommended by my freeze dryer manufacturer.
Happy freeze drying!