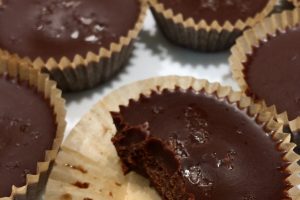
Learn how to make a creamy, melt in your mouth Healthy Chocolate Peanut Butter Cup that is sure to impress kids and adults alike. These little chocolate cups are packed full of flavor, and simple to make with minimal ingredients.
Healthy Chocolate Peanut Butter Cups
Smooth. Creamy. Melt in your mouth. Not too sweet. Something I will personally be eating in Heaven. Honestly they are absolutely delicious and a ‘treat’ that I do not mind feeding my family. These Healthy Chocolate Peanut Butter Cups are quick and easy to make with just a few basic ingredients. The half hour cool down time is the worst, but I will not lie….I have scooped this straight from the saucepan into my mouth and it is like a warm chocolate syrup – YUM! You do need them to cool a bit if you would like them in a cup form though, because those babies would be a mess to lick out of the mini baking cups while warm.

Why make these at home
Store-bought chocolate peanut butter cups not only cost a bunch of money, they are also filled with unknown ingredients and a lot of processed sugars. These are so simple to make yourself. You can have them in the freezer faster than you can make a trip to the store.
Supplies Needed:
- Organic Coconut Oil
- Organic Cocoa Powder
- Smooth Organic Almond or Peanut Butter (or live on the edge and grab some chunky nut butter!)
- Raw Honey or Pure Maple Syrup (NOT the cheap stuff filled with corn syrup and other questionable ingredients!)
- Homemade Vanilla Extract
- High Quality Course Salt
- 2 Quart Saucepan
- Cookie Sheet, Mini Muffin Pan, or a 9×13 Glass Baking Pan
- Mini Baking Cups
How to make Healthy Chocolate Peanut Butter Cups
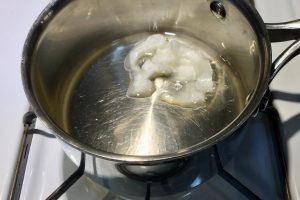
Add the coconut oil to a saucepan. Over low heat, melt the coconut oil until it is just liquified. Turn off the heat.
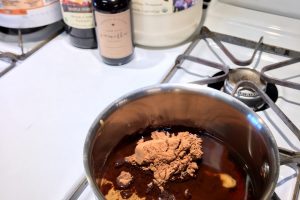
After the coconut oil is melted, add the other ingredients directly to the saucepan, except for the salt.
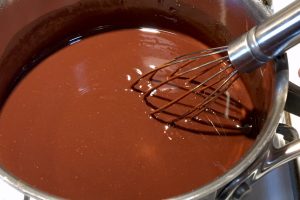
If you are using raw honey and it has crystallized, you can add a small amount of heat if needed to allow it to mix smooth. If you are using pure maple syrup (not the corn syrup junk), whisk everything together until it is combined.
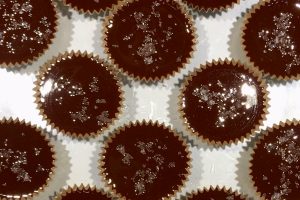
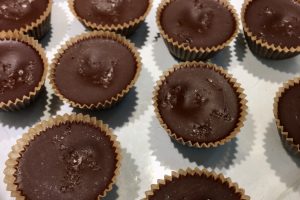
Line up 20 mini baking cups. Spoon or pour the mixture into the cups.

Sprinkle a little course salt on top of each one. The salt is optional, but I do not make these without it! It enhances the flavor of the chocolate so much!
Transfer to the freezer for about 30 minutes until everything is back to a solid form.
Enjoy and keep quiet or everyone will come running and they will be gone before you can blink. Note: Do not be afraid to lick the spatula and every last drop from the saucepan or hide in the closet after these come out of the freezer!
How long will these keep
Lol! About 10 minutes at my house! The second my family members notice these babies in the freezer, they announce it to all and come running. If you can keep your own self and family members away, I would say these would last at least 3 months in the freezer.
Tips for making chocolate peanut butter cups
I always keep mine in the freezer. I can bite into one straight from the freezer without hurting my teeth. These could also be kept in the fridge if you would like.
Feel free to eliminate the salt, but I think it enhances the flavor of the chocolate.
Do not heat this mixture to much or you will loose all of the benefits of the raw honey.
I usually double this recipes so they will last a little bit longer.
More Recipes From Scratch You Might Enjoy:
Pin It For Later

Healthy Chocolate Peanut Butter Cups
Learn how to make a creamy, melt in your mouth Healthy Chocolate Peanut Butter Cup that is sure to impress kids and adults alike. These little chocolate cups are packed full of flavor, and simple to make with minimal ingredients.
Ingredients
- 1/2 cup Organic Coconut OIl
- 1/2 cup Organic Cocoa Powder
- 1/2 cup Organic Smooth Almond or Peanut Butter
- 1/4 cup Raw Honey or Pure Maple Syrup
- 1/2 teaspoon Homemade Vanilla Extract
- Optional - Course Salt
Instructions
- Melt the coconut oil in the saucepan over low heat. Once melted turn off the heat.
- Add the remaining ingredients directly to the saucepan, except for the salt.
- If needed, add additional heat to the raw honey until it is melted. If using pure maple syrup, you should not need any additional heat. Whisk until everything is combined together smoothly.
- Line up 20 mini baking cups.
- Spoon or pour the mixture into the cups. Sprinkle a little course salt on top of each cup.
- Transfer to the freezer for about 30 minutes until everything is back to a solid form.
Notes
Feel free to use honey or maple syrup or a combination of both. It will be delicious either way.
Use almond butter or peanut butter, both are amazing.
Change things up a little and use a chunky peanut butter.
I often double this recipe.
Marissa says
This is great! I am always looking for healthier desserts. I pinned this too and can’t wait to try them!
Aunt Niki’s Farm says
Thank you so much! Enjoy! ♥️
Laura says
These look so good!! Bookmarking as a go-to food gift idea!
Aunt Niki’s Farm says
Thank you so much! Enjoy! ♥️
Michele says
Oh my goodness, these look SO good! Thank you!
Aunt Niki’s Farm says
You are so welcome! Happy I could help. Thank you for ALL you do as well! I appreciate you and all of your help! ♥️
Kimberly says
These sound delicious…and the recipe looks super easy to follow!
Aunt Niki’s Farm says
They are delicious! Thanks for stopping by! ♥️